Biztalk 2016 / SQL Server 2016 – MAXDOP and MSDTC port range

At my dayjob, we have a sizable Biztalk installation. We are currently running Biztalk 2016 / SQL Server 2016, and it ran well for half a year or so.

But, some months ago, we started getting deadlocks in the MessageBox database, causing substantial problems.

We are currently running a Microsoft case (of the “Production down” sort), and in that case we have learned, that at least two things, that seem to be an “accepted” way to setup biztalk, may not be supported by Microsoft.

Setting up MSDTC with a limited port range
https://www.biztalkadmin.com/firewall-and-msdtc/

Setting up MAXDOP on the SQL-server, on the database-level instead of the instance-level (this has only been possible since SQL Server 2016):

https://www.codit.eu/blog/2017/11/sql-server-2016-max-dop-at-database-level/

vs. the official MS guide (which is clearly written with regards to sql-server versions before 2016):
https://docs.microsoft.com/en-us/biztalk/technical-guides/sql-server-settings-that-should-not-be-changed

Question regarding MAXDOP:
I think the Biztalk Health Monitor tool is only checking the MAXDOP value on the Instance-level. While the instance-level MAXDOP value is indeed set to 4, The MAXDOP has been set to 1 on the Messagebox database
As far as we can read, only the MessageBox requires MaxDOP 1. Do you see a problem with doing it this way?
MS Answer:
We use TempDB a lot in our queries and we have never tested with this configuration only per database so please change the SQL instance also so we make sure TempDB and other system databases are running ok as well.

MS comment with regards to the limited port range for MSDTC:
I see you have a very tight range of ports. This is not recommended. I would recommend to use full range of ports and instead do firewall on IPs instead of ports to not block BizTalk/SQL batches:
Ports range A range of TCP ports have been specified: 5000-5100
The default is 49152-65535 (around 16000 ports) . we increased from Windows 2003 which only had 4000 ports (1024-5000) up to the new range. Also if a range is needed it is recommended to use high range to not interfere with lower known ports, e g 20000 and higher range.

I should point out, that the reason for these deadlocks in MessageBox is still not determined. The system after all ran well with the database-specified MAXDOP and limited MSDTC port range for half a year or so.

For the MAXDOP setting, we are currently considering reversing the current setup – ie. setting the MAXDOP to 1 on the SQL instance and to a specific MAXDOP on our custom databases, which should satisfy Biztalks demand.
Reset cartridge status on Brother HL-4040 and similar

This tip can be found many places. I just copied it here for safekeeping

frightanic.com

My rather new Brother started raising “false” alerts (at least I think they’re false…) about empty/dead toner, “Toner Life End” it said on the device display. I had only printed a few hundred pages so far. In search for an answer Google directed me to http://www.fixyourownprinter.com/forums/laser/39806.

It’s a long and chaotic thread but about 1/5 from the top there is a posting that advises to do following for Brother HL-4040 and similar models.

How to reset toner warning “Toner Life End”

For the toner life reset menu:
1 Open the front cover of the printer
2 press and hold the cancel button
3 press the reprint button while still holding cancel
– here is the reset menu – go to the appropriate cartridge on
– the menu and reset it and you’re done!
– It seem to work the easiest, if you do it quickly

FYI… Pressing the “Go” button and the up arrow gives you the parts life reset menu (drum, laser, fuser, etc.)

I also did the electric tape over the windows – which worked before the reset – but I thought this fact would be helpful too.

For anyone that is asking “what window?” I think it is the clear plastic opening on the sides of the cartridges where you can actually see the powder inside the cartridge – the color of the toner (magenta, yellow, or cyan). I didn’t really know that for sure when I tried, but it made sense, and it worked. So I am fairly sure that is the “window” you should be trying to cover.

Comment from “Jezza P”

NB – every cartridge is listed twice on the reset menu “-H” for High capacity cartidges and “-S” for standard – make sure you pick the correct one for your cartidges otherwise it errors. 130 are standard and 135 are high.

Maginon SP-2 Smart Plug – Final part

The only thing that remains is to create the code to make the initial setup and some code to turn the plug on and off.

Although I have been a software developer for many years, I have never really made much socket-programming, so I tried to find something on the internet to build on.

After quite some searching, I found this discussion on stackoverflow.

This actually issues the correct commands to make the initial setup of a Maginon SP-2 smart plug. However, it needs a small correction to make it work with the Maginon plug – the same that I mentioned earlier with regards to the Orvibo socket. Alle replies from the socket will be received on UDP port 48899.

I have made a corrected version of the register.c program here.

Before you compile the program, change these two lines to match the SSID and Wifi password to your own router  (change DLINK to your SSID and the xxxPASS_WPA_PASSxxx to your Wifi password.

static const char *ssid = "AT+WSSSID=DLINK\r";
static const char *sec_settings = "AT+WSKEY=WPA2PSK,TKIP,xxxPASS_WPA_PASSxxx\r";

The program is compiled with:

gcc -O0 -o register register.c

Before you run the program, be sure to assign the socket a static ip-address in your router. To do this, you need to get the MAC address of the socket, and then in your router, assign a static ip-address to that MAC address.

Now run the program

register

When the socket reboots, it should connect to you own WIFI router. Check the router to see if it has done so.

When it is connected, these two python scripts to turn the socket

On:

#!/usr/bin/env python

from socket import *
from datetime import datetime

HOST = 'plug1'
PORT = 8899
BUFSIZ = 1024
ADDR = (HOST, PORT)

tcpCliSock = socket(AF_INET, SOCK_STREAM)
tcpCliSock.connect(ADDR)

data2 = 'AT+YZSWITCH=1,ON,'+datetime.now().strftime('%Y%m%d%H%M')
tcpCliSock.send(data2)
data1 = tcpCliSock.recv(BUFSIZ)
print data1

tcpCliSock.close()

and Off:

#!/usr/bin/env python

from socket import *
from datetime import datetime

HOST = 'plug1'
PORT = 8899
BUFSIZ = 1024
ADDR = (HOST, PORT)

tcpCliSock = socket(AF_INET, SOCK_STREAM)
tcpCliSock.connect(ADDR)
data2 = 'AT+YZSWITCH=1,OFF,'+datetime.now().strftime('%Y%m%d%H%M')
tcpCliSock.send(data2)
data1 = tcpCliSock.recv(BUFSIZ)
print data1
tcpCliSock.close()

In both cases, you should modify the HOST line in both scripts and set it to the DNS name or the ip-adress of your plug

When you can turn the socket on and off, you can also try to use the delay command

AT+YZDELAY=1,OFF,5,201701232127

It can be used for both ON and OFF. The number after ON/OFF is the delay in minutes.

Maginon SP-2 Smart Plug – Part 3

Go to part 2

Since the investigation until now has not given any concrete hints as to how to achieve the main goals:

  1. Make the socket associate and connect to my own Wifi network
  2. Make the socket turn on and off

another approach was needed.

The next most obvious option to me, was to try to intercept the network-communication between the Maginon SP-2 app and a WIFI network. To do this, the app has to believe that it is connecting to a real socket. So I set a router up to imitate the Maginon socket – with the same SSID and WPA password that the socket uses. The router did not allow for modifying its MAC-address.

Sadly, although I, a few brief times, was able to see my “fake” WIFI from the app, I was never able to make the app believe it was the real socket enough to make it try to associate with it. This was a bommer, since I have read about several other sockets, where this was trivially easy. I still do not know why the app did not believe it was a real sockets WIFI.

Next option – decompile the Android app and look for hints. There are several free sites which will decompile an APK file.

With the Maginon app decompiled, you can search for a lot of interesting things in the .java files (eg. using ‘find’ in Linux or something like WinGrep on Windows)

  • 48899
  • 8899
  • http:
  • HttpGet
  • AT+
  • AT
  • 10.100.100.254
  • 192.
  • Reco
  • connect
  • admin

When you look into the java-files that contains these search-words, you learn primarily three things:

  • A list of URLs that the app accesses. This is the final “proof” that the socket is probably a Reco4life socket
  • A suggestion, that port 48899 is used to set up the socket and port 8899 is used for ordinary use afterwards
  • A list of AT- or AT-like commands that the app issues to the socket
Port AT command Description
8899 AT+YZSWITCH=1,ON,201410292146\r\n Switches the socket on
8899 AT+YZSWITCH=1,OFF,201410292146\r\n Switches the socket off
8899 AT+YZDELAY=1,OFF,5,201410292146\r\n Switches the socket on or off after a delay (in minutes)
8899 AT+YZOUT\r\n Seems to return the energy consumption statistics
8899 AT+VER\r\n Returns the version of the socket SW and (probably) the Wifi stack SW
48899 AT+EPHY=off\n  Disable ETH interface
48899 AT+FAPSTA=on\n
48899 AT+LANN\n Query LAN setting in AP mode
48899 AT+PING=173.194.72.103\n PING ip address
48899 AT+PING=176.58.117.69\n PING ip address
48899 AT+PLANG\n
48899 AT+Q\n
48899 AT+WANN\n Query WAN setting in STA mode
48899 AT+WMODE=APSTA\n Set WIFI work mode
48899 AT+WMODE\n Query WIFI work mode
48899 AT+WMODE=STA\n Set WIFI work mode
48899 AT+WSKEY\n Query WIFI Security parameters as STA
48899 AT+WSKEY=OPEN,NONE\n Set WIFI Security parameters to no encryption
48899 AT+WSKEY=pwMethod,PwMatch,Pwd\n Set WIFI Security parameters
48899 AT+WSLK\n Query WIFI link status as STA
48899 AT+WSSSID=ssid\n Set WIFI target AP SSID as STA
48899 AT+Z\n Restart WIFI module
48899 HF-A11ASSISTHREAD Sending command to the socket will make the socket respond with its ip-address etc. If you respond with “+ok” all the other AT-commands are enabled for use. Some sites call this command as a sort of “password”.
48899 WIFIKIT-214028-READ Unknown
48899 YZ-RECOSCAN Sending command to broadcast address will make all sockets in network respond with their ip-addres, MAC and hostname
48899 +ok Response to HF-A11ASSISTHREAD

“\r\n” means CRLF (characters hex 0a + hex 0d)

3 of these commands stand out

  • HF-A11ASSISTHREAD
  • WIFIKIT-214028-READ
  • YZ-RECOSCAN

From the .java files, it is clear that YZ-RECOSCAN is used to scan a network for active sockets. The purpose of WIFIKIT-214028-READ is not clear from the sources, and a search on Google does not turn up much usable.

HF-A11ASSISTHREAD is another matter. The usage in the .java is not clear, but a search on the internet brings up a lot of interesting links.

One of them is this post from Andrius Stikonas concerning an Orvibo S20 socket. The control part of this socket is clearly different from the Maginon socket, but the setup/initial pairing-part seems to be similar. Strangely enough, the description from Andrius cannot be used 100% for the Maginon socket. Andrius writes, that “The socket always replies to the same port as the source port of your message.“. This is not correct in regards to the Maginon socket which will ALWAYS respond back to your source ip on UDP port 48899. Hence, in your code, you need to control both source and destination UDP port. Apart from this, the description from Andrius can be used directly for initial pairing of the Maginon socket.

Now we have the needed information to setup and control the socket.

Philips Hue bridge – Cannot find a new bulb

When you buy a Philips Hue kit like the Dimmer with an extra bulb, the bulb is already linked to the dimmer. This means, that the bridge cannot find this bulb. First you have to instruct the bridge to takeover a bulb (from another bridge, a dimmer or similar), before it can be added.

This information is for the version 1 of the bridge (the round one), but I believe that method 2 also works for the newer bridge

There are 2 methods for doing this – depending on the version of the bridge firmware. In both cases, start by placing the bulb immediately next to the bridge (like 30 cm.)

  1. for older firmwares, telnet to port 30000 on the bridge and type
    [Link,Touchlink]
    and stop the telnet
  2. for newer firmwares, use your own code or the CLIP debugger and on the
    http://<ip>/api/<username>/config
    object, PUT the value
    {“touchlink”:true}

In both cases, the bulb should blink to signal that it can now be seen by the new bridge. Now you can use normal methods (like the app, CLIP debugger or own code) to link the bulb to the bridge.

Do not copy/paste the texts from above, since this will often result in “body contains invalid json” error messages. Type them by hand.

The same problem occurs, if you want to move the bulbs from one bridge to another without using the official app

To use the clip-debugger, you need to first find the ip-address of your hue-bridge, and then enter the url below into a browser
http://ip-address/debug/clip.html

Maginon SP-2 Smart Plug – Part 2

Go to part 1 – Go to part 3

It is now necessary to gather as much information about the plug as possible.

If you plug it into a power socket and power it on, you will see a new WIFI network SSID available. In my case, it was called “Reco900000621“. If you try to connect to it, you will be asked for a network WPA key. If you look at the backside of the plug, you will find the WPA key.

BTW, the “Reco” part turns out to point to the real producer of this plug – apparantly “Reco4Life.com“. Their homepage Reco4Life is sadly in chinese – at least the forum, where a little bit of usable information (the AT commands) can be found using Google Translate if you are patient. I have not been able to find this exact plug on their website.

Now you should be connected to the socket. You will see, that you have been assigned the ip-address 10.10.100.150 and that the gateway (the socket) is assigned the ip-address 10.10.100.254

Next task. Which ports are open on the device. If you run a nmap scan from a linux box, you will find these TCP ports open

nmap -p1-10000 10.10.100.254

PORT     STATE SERVICE
80/tcp   open  http
8899/tcp open  ospf-lite

and these UDP ports.

PORT   STATE         SERVICE
53/udp open|filtered domain
67/udp open|filtered dhcps
48899/udp open|filtered unknown
MAC Address: AC:CF:23:XX:XX:XX (Hi-flying electronics technology Co.)

We can also note, that the MAC belongs to “Hi-flying electronics…..”. This points to the producer of the WIFI chip in the socket.

Since the HTTP port is open, the next obvious step, is to try to connect to it using a browser. If you try, you will be asked to provide a username and password. Since none are available, random guesses will show that ADMIN/ADMIN works. Sadly though, all you get for your troubles is a “ERROR:404 Not Found” message. No matter what I have tried, I have not been able to find an URL that returns anything else than this error-message. If you find any that works, please let me know.

Afterwards (unfortunately I cannot remember where) I have found mentioning of other smart plugs which provides this apparantly dummy http-server which is not meant to be used.

Next possible target is the open TCP port 8899. If you telnet to it

telnet 10.10.100.254 8899
Trying 10.10.100.254...
Connected to xxxxxxxx.
Escape character is '^]'.

nothing happens. Whatever you type, you are treated with a “+ERROR” message. This looked to me like a response to a AT command (like in the good old modem days). Hence I tried many-many AT commands, but I only ever got the +ERROR message.

As it turns out, at this point already, one can actually control the socket, if you know or guess the exact AT commands to send (on / off). I have only found 4 commands that give a response on this port.

The downside to issuing the commands here, is that you need to be directly connect to the WIFI network on the socket and cannot access it through your normal network. This makes this solution unusable for most purposes.

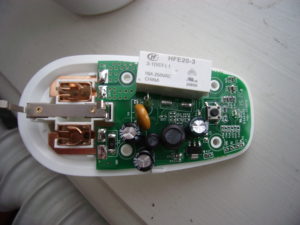
As socket setup is not yet clear, it might be an idea to take a quick look inside the plug – it might be possible to see which IC’s the socket uses

Maginon SP-2 plug
Maginon SP-2 plug

Sadly, apart from the relay itself, not much important is visible from this side. All the important stuff is apparantly mounted on the reverse side. And it is soldered VERY well to the socket legs, and I do not want to possibly ruin the plug by de-soldering it.

The only other interesting thing which is visible, is that the socket has a serial interface on the bottom right in the picture. You can use a standard 3V3 serial USB interface to communicate with the socket.

While it was easy to get the serial communication up and running, I was not able to learn anything relevant from it. I did not investigate it much. On the surface it looks very similar to what you get when you connect to TCP port 8899.

To connect to the serial interface on the socket, connect the GND, TX og RX pins on the socket to the 3V3 USB interface and use connection settings

115200 8/N/1

in eg. minicom (linux), HyperTerminal (Windows) or similar

Create a new Eventlog source

If you want to use a new “Source” in the Windows event log, you cannot simply start to use a new text.

A new Event-log source has to be created first – BEFORE you start to use it.

Run this command as an administrative user to create a new source – here named “NEW SOURCE”

eventcreate /l application /id 100 /t information /so "NEW SOURCE" /d "Creation of a new Event Source"

To create a new “Source” in the Windows event log, you need administrative privileges

Run a Windows scheduled task by hand

If you have created several scheduled Tasks in Windows, you may from time to time want to run some of them manually

The obvious solution is to open the Windows “Task Scheduler”, locate the proper scheduled task, right-click it and “run now”

An alternative is to copy the name you have given the scheduled task. Then you can always run the following command in a command-line

SCHTASKS /Run /TN "Start SQL Management Studio"

if the name of you scheduled task is “Start SQL Management Studio”

Maginon SP-2 Smart Plug – Part 1

The Maginon SP-2 Smart Plug could be purchased at Aldi for some time

The official page for them can be found here: www.supra-electronics.com

As so often today, the only intended way to interact with the plug is to use an Android or a IOS app.
The Android app is rather poor – I have not seen the IOS one.

The userguide claims that the GPL sourcecode can be downloaded from the supra website at sp-gpl.net, but there you can only find the source for the Maginon SP-1E

So – the quest – how can these plugs be utilized without using an app – specifically how to (with own code):

  1. Make the socket associate and connect to my own Wifi network
  2. Make the socket turn on and off

It is, in fact, relatively easy to program them directly – when you first find out how to do it.

Windows (many versions) caches old AD-account information

Windows – both client and server, in many versions – caches old AD-account information.

Most often, this gives problems, when a user changes their username in AD, but on another server, the old username is cached and associated with the users SID. So when a username for a given SID is requested on the other server, the old username is returned.

The reasoning behind the functionality can be found here:

The LsaLookupSids function may return the old user name instead of the new user name if the user name has changed

The cache can be disabled by inserting DWORD 0 in registry-key HKEY_LOCAL_MACHINE\SYSTEM\CurrentControlSet\Control\Lsa\LsaLookupCacheMaxSize

This article gives no other method to reset the cache – apart from restarting the server.

Other users have found better solutions – such as running the short 2-line PowerShell given below, which updates the cached AD-information for the given user.

http://serverfault.com/questions/266180/purging-ad-principal-from-cache

$objuser = new-object system.security.principal.ntaccount “domain\<new account name>”
$objuser.translate([system.security.principal.securityidentifier])